REDO #37 MAUVE BLOUSE & #38 DRESS PANTS
Thursday, October 27, 2011 at 5:08pm
My computer was OUT for a few days :( Its dreadful when it happens because a lot is stored on it and everything is done online. Thanks to our great friend P, who ALWAYS comes to the rescue(standing ovation), fixed it. AGAIN.
So, I am finally able to post my redo for the week. YAY!
I got this blouse from my mom who thrifted it recently, but was too big. I really think, she thought I wasn't going to like it or wear it.
Did that make sense? lol
She was totally surprised and impressed by the changes, when she came to church with us this Sunday!
And the 2nd item I worked on was thrifted years ago. I've worn the pants as is but they always fit awkwardly. I could never "win" with these pants. They were made with an abundance of room in the hip area and pretty narrow on the waist. When I was slimmer they would sit nicely on my hips....but I had empty saddle bags LOL :/
Now and then when I've filled in the "bags" the waist has been too snug, ok tight. haha. EEEEK, muffin top on ANYONE ( I've seen tiny girls w/ muffin tops) is yucky.
1. BLOUSE- Mom thrifted
2.PANTS- Previously thrifted
 1.BEFORE: Blouse given to me by my mom but too big.
 The sleeves were a sheer material in the same color. The arm opening was really wide so hopefully taking it in would make it smaller.
 I turned it inside out and took in about an 1in. from each side but eventually took in 1/2 in. more. I left as is, no cutting.
 I wanted to have the shirt gather a bit in the back so I used some elastic I had leftover from REDO #3 (cummerbund). I don't know HOW I learned this but certain fabrics will melt in heat. This is a perfect way to stop fraying, so I burned the ends for that reason. Its seals them right up!

 Still inside out, I pinned each end of the elastic BETWEEN the 2 back seams.
*TIP: If you want a lot of gathering, pin the elastic further out to the left/right so that there's more material between the elastic OR just use a longer piece of elastic*
This scrunched the fabric in the middle.
I then did the best to pin & pleat the rest of the material that was under elastic.
 As you sew, stretch the elastic so that it will scrunch up when done. NOT BAD eh? My 1ST elastic sew on job!!!
 2. BEFORE: can you see the HIPS?!
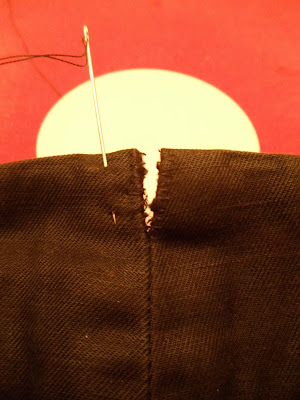
 I turned inside out and sewed from right under the waist down past the pockets, about 2ish inches. It did close up the pockets a tiny bit I was OK with it, I wanted better fitting pants.
 Then I slightly unstitched the center back seam, sewed the sides and the stopping point.
ei X-----X so that it wouldn't continue to spread open.
 THAT wasn't enough! I then unstitched both hip areas and did the same thing.
 You couldn't really tell from the picture but the pants had creases that had lightened over time. So I used the last box of black RIT dye I had and dyed the pants.
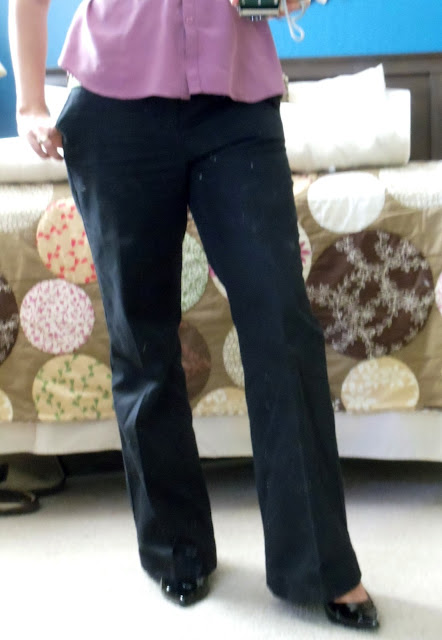
 AFTER: I wore both items with an avocado tank, my black stretchy belt, heels, pewter necklace bracelet (hubby bought in Eureka for me!), earrings & my GREEN ring!
I tell you I love it.
I've noticed too that my last 3 posts all consist of a green/pink combo lol Totally not planned. :)

 SIDE & WAIST: NO muffin top!
YES to breathing and walking comfortably. Not sure what will happen IF I get a tad slimmer, will they slide lower? 1 problem at a time :)
 BACK: I ironed the blouse before wearing, including the new pleats that were formed with the elastic addition. I LIKE!
So, I am finally able to post my redo for the week. YAY!
I got this blouse from my mom who thrifted it recently, but was too big. I really think, she thought I wasn't going to like it or wear it.
Did that make sense? lol
She was totally surprised and impressed by the changes, when she came to church with us this Sunday!
And the 2nd item I worked on was thrifted years ago. I've worn the pants as is but they always fit awkwardly. I could never "win" with these pants. They were made with an abundance of room in the hip area and pretty narrow on the waist. When I was slimmer they would sit nicely on my hips....but I had empty saddle bags LOL :/
Now and then when I've filled in the "bags" the waist has been too snug, ok tight. haha. EEEEK, muffin top on ANYONE ( I've seen tiny girls w/ muffin tops) is yucky.
1. BLOUSE- Mom thrifted
2.PANTS- Previously thrifted


*TIP: If you want a lot of gathering, pin the elastic further out to the left/right so that there's more material between the elastic OR just use a longer piece of elastic*
This scrunched the fabric in the middle.
I then did the best to pin & pleat the rest of the material that was under elastic.


ei X-----X so that it wouldn't continue to spread open.


I tell you I love it.
I've noticed too that my last 3 posts all consist of a green/pink combo lol Totally not planned. :)


YES to breathing and walking comfortably. Not sure what will happen IF I get a tad slimmer, will they slide lower? 1 problem at a time :)


PANTS


great job with the shirt, that's a cute outfit, merry Christmas!
ReplyDeleteThanks Shey! I really appreciate you stopping by. Merry Christmas to you too :)
ReplyDelete